Linux on the Low End
Installing Linux on a PCI Power Mac, Part 1
- 2006.09.05
I apologize for that it has taken so long to get this article out. I've been extremely busy lately with a new third shift job (and not getting a lot of sleep) and a custody case that finally ended last Friday. I'll endeavor to try to get the next few articles out on a more timely basis.
The Power Mac 7500/100 I'll be installing Linux on has the following hardware:
- Processor: Sonnet G3/400 with 1 M cache
- RAM: 256 MB
- Video card: ATI Rage II w 4 MB VRAM
- Hard drive 1: Stock Apple 1 GB SCSI connected to the NCR SCSI controller. This controller is labeled STD SCSI SCSI-1
- Hard drive 2: 4.5 GB IBM 50-pin drive connected to an Adaptec 2940AU PCI controller with a 50-pin connector. The controller and the drive are both 20 MB/s.
- CD-ROM drive: Stock Apple 24x connected to the NCR controller
- PCI USB: Opti PCI USB v1.1 controller
- Microsoft USB 5-button mouse, which also works in OS 9.1 (I'm not a fan of the Mac mice that I have. They don't track very well, and when running Linux, a mouse with two or more buttons is very desirable - more on this later.)
Step 1: Install CDs
Where to get the openSuSE v10.0 CD ISOs (burnable images):
These CDs are about 700 MB each, so a high speed connection is a must. After downloading them, you should be able to burn them using you're favorite CD authoring program ((give examples? K3B? Adaptec?)).
Step 2: Setting Up Your Mac OS Drive
The first step will be to setup your Mac OS drive. In the past I installed Mac OS 9.1 on the 1 GB drive that came with the machine using one Mac OS partition and one ProDOS partition. As I mentioned previously, the ProDOS partition will be used to store updated boot information after you get any kernel updates, since openSuSE Linux doesn't handle HFS+ partitions (more on what that is and how to do it later).
After installing the Mac OS, I installed the Sonnet enabler to make sure that the backside cache on the upgraded CPU was working properly. Before installing the Sonnet extension, Apple System Profiler showed the processor as 445 MHz (instead of the actual 400 MHz). After installation, the correct speed was displayed.
I chose OS 9.1 over 8.5 because 9.x displays the date using 4 digits for the year. I've seen problems starting Linux when the date has defaulted to either 1904 or 1956 when running on machines with dead PRAM batteries (which this 7500 has). So long as you set the date and time before starting Linux, there should be no problems.
Due to the way that Open Firmware works on the "Old World" Macs, it is necessary to start the machine using Classic. You can't boot these Macs directly into Linux.
Step 3: Installing Linux
The next step to installing Linux on an Old World Mac is to obtain the BootX boot program. This program is used to restart your Mac into Linux. You can download it here:
http://penguinppc.org/historical/benh/BootX_1.2.2.sit
Once you've download BootX, you'll have to uncompress it. I generally allow it to create the BootX folder on the desktop, since I don't plan on using Classic that much.
After it's been uncompressed, open the folder. You will see 7 items in it. The ones we will be using are the main "BootX App" program, the "Linux Kernels" folder, and the "Utilities" folder.
Now we need to insert the openSuSE v10.0 install CD and open the folder labeled "suseboot" (not the one labeled boot). In this folder you'll find the "initrd" file, which you will copy to the Linux Kernels folder.
You'll also see the file "linux32.gz". This is a compressed file that will have to be opened with a program like Stuffit Expander. Open the archive and place the file in the Linux Kernels directory as well.
Step 3.5: Only for G3 CPUs
Skip this step if you're using a 601, 603, or 604 CPU.
Once the kernel and initrd files are copied, open the Utilities folder. Then open the folder called "GrabG3CacheSetting". Then you need to run the program called "GrabG3CacheSetting". This program gives Linux the information it needs to make sure that the backside cache of the G3 processors is turned on. It will give a list like this:
Start:

Querying CPU Family...

Setting value of G# L2CR register ...

L2CR value is: 0xb9000000, saving...

Done.

The "Set G3 Cache" option in BootX should now be available.

End
The L2CR value will be different depending upon the G3 processor that you're using. Close this windows and select "Don't save".
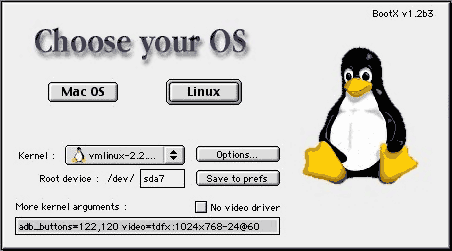
Step 4: BootX
Now we can start the BootX program. Double click on the BootX App icon. It will show something like this:
Click the "Options" button. There should be 4 options listed. It will look like this:
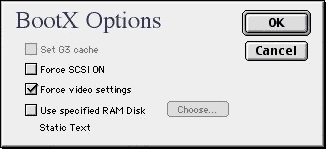
Check the box for the "Set G3 cache" and the one for "Use specified RAM Disk". If it doesn't bring up a window for selecting the RAM Disk, click on "Choose...". Select the "Linux Kernels" directory, select the "initrd" file, and then click "Open". Now click "OK". Click on the box under the "More kernel arguments:" label and type "acceleratedx=1".
The penguinppc.org website is an excellent resource for running Linux on PowerPC machines.
After we've finished setting up Linux on you're system, we'll have to modify some of the BootX options so the Linux installation will start automatically. BootX includes an extension so you don't have to wait for the entire Mac OS to start up. It brings up the BootX menu early in the boot process. However, you have to be careful to make sure that the Sonnet (or other G3 processor) extension loads before the BootX extension or the backside cache won't be turned on and system performance will suffer.
Step 5: Installing openSuSE Linux
 Make sure that the first install CD is inserted into the
CD-ROM drive and click on the "Linux" button. BootX will now reboot
you're system into Linux. You'll see a penguin at the top left
corner of the screen, and a lot of text will scroll past. These are
the messages that Linux gives to let you know what it is doing. You
should then see it say:
Make sure that the first install CD is inserted into the
CD-ROM drive and click on the "Linux" button. BootX will now reboot
you're system into Linux. You'll see a penguin at the top left
corner of the screen, and a lot of text will scroll past. These are
the messages that Linux gives to let you know what it is doing. You
should then see it say:
- >>> SuSE Linux installation program v1.9.16 © 1996-2005 SuSE Linux Products GMbH <<<
- Starting hardware detection...
- Activating usb devices... done
- Searching for info file...
- Loading Installation System (68600 kB) - 100% (This will show a percentage that will increase to 100%)
Then it will show a few more messages like these:
starting udev... ok

starting hald... ok

starting syslogd (logging to /dev/tty4)... ok

starting klogd... ok

starting yast...

Probing connected terminal...

Initializing virtual console...

Found a Linux console terminal on /dev/console (80 columns x 30 lines).

Please supply a config file
If not, and you get a message saying something like Kernel Panic or a system lockup, then there is a problem somewhere that you'll have to troubleshoot. I had this happen on my Power Mac 9600/300 because of the Opti USB card (which works just fine when it is installed in this PM 7500 or my Beige G3). Weird to say the least.
If everything has gone smoothly, you should see the installation program start. If not, you'll see it do some stuff and then show this:
*** An error occurred during the installation.


Main Menu


1) Settings

2) System Information

3) Kernel Modules (Hardware Drivers)

4) Start Installation or System

5) Verify Installation CD-ROM/DVD

6) Eject CD

7) Exit or Reboot

8) Power off

>
If you get here, you can select the system information to see some different information about your system and to have the kernel messages displayed. When text scrolls past on a Linux system, you can use "shift-PgUp" or "shift-PgDn" to look at what has scrolled past. Otherwise you can just turn the machine off. It won't hurt anything, and the next time you power it, on it will boot into the MacOS.
Next time I'll go over the installation in depth, so you should have a working system to try out. I'll endeavor to have the article up later this week.
Thanx for sticking with me.
![]()
About LEM Support Usage Privacy Contact
Follow Low End Mac on Twitter
Join Low End Mac on Facebook
Favorite Sites
MacSurfer
Cult of Mac
Shrine of Apple
MacInTouch
MyAppleMenu
InfoMac
The Mac Observer
Accelerate Your Mac
RetroMacCast
The Vintage Mac Museum
Deal Brothers
DealMac
Mac2Sell
Mac Driver Museum
JAG's House
System 6 Heaven
System 7 Today
the pickle's Low-End Mac FAQ
Affiliates
Amazon.com
The iTunes Store
PC Connection Express
Macgo Blu-ray Player
Parallels Desktop for Mac
eBay
![]()
