
This guide shows you how to replaced the optical drive in both the Lombard and the Pismo PowerBook, which uses exactly the same drive bay modules.
I purchased a Lombard PowerBook G3 in 2005 and started upgrading it, adding everything from more RAM and a bigger hard drive to a DVD-RW. I parted with it in 2007 and kind of missed it, so I bought another one recently and plan to do the same upgrades to it, maxxing it in every way.
This is a nice machine for its age (built in 1999) and still capable of meeting most needs for most users. It is capable and supported by Apple to run Mac OS X 10.3 Panther. With 512 MB, mine coped very well.
With a modified Tiger DVD I managed to install Mac OS X 10.4 Tiger on my Lombard without the need for tweaking, hard drive cloning, or using third party installers like XPostFacto.
There is plenty to be done to boost your aging PowerBook. You can upgrade the RAM, replace the hard drive and the optical drive, and upgrade the processor to a faster G3 or even a G4.
Preparation
Before you start, you should power off the machine and remove the mains plug. Leave it for about 10 minutes before you do anything else to it. This will just let it cool off a little.
Drive Bay Removal
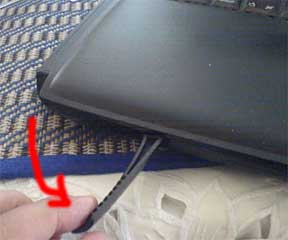
Next, remove the battery. Pull the release tab, and the battery will pop out a little. Now pull the battery further until it is clear of the machine.
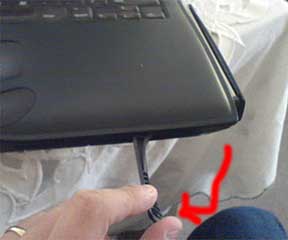
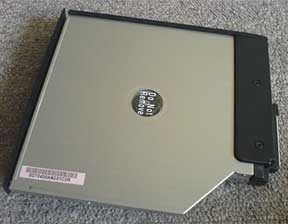
Next, do the same to the optical drive.
For instructions on how to replace the CD-ROM drive with a different drive, please see step 11 at the bottom of the page.
Hard Drive Caddy Note
Now you are happily putting everything back into place, this is a small note to remember.
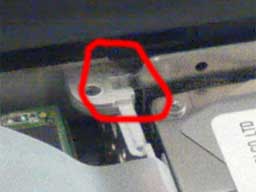
When you replace the hard drive caddy, the top end where the screw holes are at the edge nearest the screen fits into a little lug. Ensure this it pushed into the lug – otherwise the metal shield will not go home.
Replacing the Optical Drive
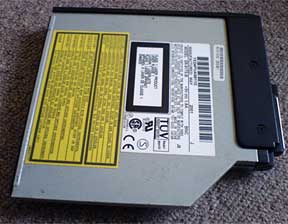
Please follow steps 1 and 2 before proceeding to replace the optical drive. My PowerBook came with a CD-ROM drive, and I first replaced it with a DVD-ROM, and more recently with a DVD-RW. You can replace it with virtually any laptop optical drive.
While it is possible to replace it with a CD-RW drive or DVD-RW drive, burning drives are less compatible, so be sure it will work before purchasing one, check out Accelerate Your Mac for compatibility. Mine is fitted with a slot loading Panasonic/Matshita UJ-815-A DVD-RW.
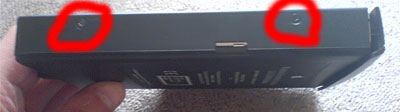

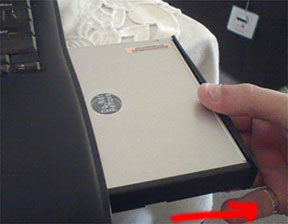
Anyway, once you have the drive out, you need to remove the casing that helps it fit into the drive bay slot. This is held in using four screws, two on each side.
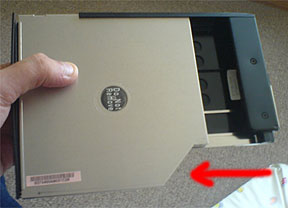
Once the screws are out, simply slide the current drive out of the casing. Then slide the new drive into place.
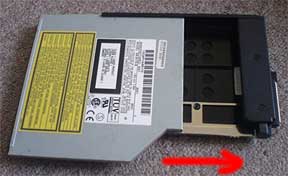
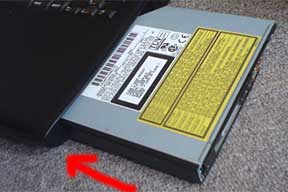
Then replace the four screws to hold the drive into the casing and slide it back into the drive bay.
NOTE: You may need to remove the drive bezel from the front of the new drive. These are generally a specific shape depending on what machine they came out of.
You may be lucky enough that the bezel from the PowerBook’s original drive will fit. If not, you will have to trim the bezel from the new drive until it allows the drive to close properly.
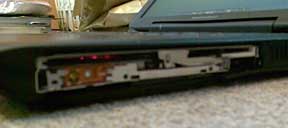
Unfortunately, mine came without a bezel, but it works fine, just looks a little ugly.
BE AWARE: the button and drive light may not be in the same place as the previous drive so you may need to use the new bezel and trim it.
About This Mac
To ensure the drive you installed is working, you can check the Apple System Profiler.
Under OS 9, boot the machine. Click on the Apple Menu in the top left hand corner and select Apple System Profiler. On the first screen you will see memory, processor, and start up drive. If you click the Devices and Volumes tab, you can see which drives are installed.
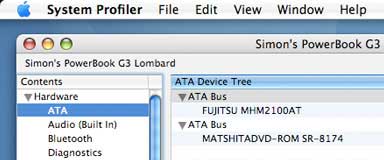 Under OS X, boot the machine. Click on the Apple in the top left hand corner and select About This Mac. This will tell you what OS version you are running, what processor you have, and the amount of RAM installed. Click the More Info button, and under ATA it will show which drives are installed.
If you want to use your new optical drive with iTunes, iDVD, etc., you will probably need to use Patchburn, a free utility that is available for Mac OS X 10.2, 10.3, and 10.4. Most third-party software should recognized and work with your new drive.
Have fun with your upgraded PowerBook. If you have any questions or suggestions for this guide, please email me.
Hardware upgrades are performed at your own risk. I and Low End Mac take no responsibility for any damage to any equipment or data when you perform an upgrade using this guide. I have successfully done this myself and offer this information to aid others.
Follow Simon Royal on Twitter or send him an Email.
Like what you have read? Send Simon a donation via Tip Jar.
keywords: #replace #lombard #pismo #optical #drive #superdrive #techspectrum #simonroyal
short link: http://goo.gl/uIWywd
searchword: replacelombardpismosuperdrive
