Mac Daniel's Advice
Fixing the Hinge on the 'Blackbird' PowerBook 500 Series
- 2007.07.16
Mike Huttinger shares his technique for fixing hinges on his PowerBook 520C. These instructions should apply equally to the 520, 540, 540c, and 550c. dk
I fixed the hinges on a PowerBook 520C, and the fix seems very solid - much stronger that the original, though the downside is that there are four nuts on the outside of the case where I put the small bolts for repair.
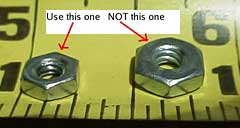
The bolts used are 1/2" by 1/8" round head. There are two size nuts that I found that will fit this bolt. The smaller size works a lot better in my experience. Note I used a small star washer under the nuts on the outside of the case where they would fit.
 When I
drilled through the case, the hole I made was slightly larger than the
original screw hole where it went through the hole in the metal part of
the hinge. If the hinge isn't removed (I didn't remove it), a magnet
and a vacuum cleaner might be used to clean up any metal shavings from
the drilling.
When I
drilled through the case, the hole I made was slightly larger than the
original screw hole where it went through the hole in the metal part of
the hinge. If the hinge isn't removed (I didn't remove it), a magnet
and a vacuum cleaner might be used to clean up any metal shavings from
the drilling.
Take the small plastic piece off that covers the hinges at the bottom of the screen. This pulls off at the bottom of this piece not the top.
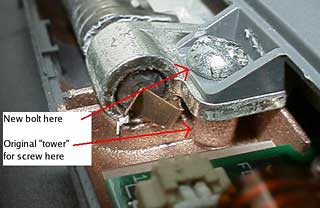
The hinges are held on with three screws: one that goes into the body of the Mac and two that go into the top cover. The break on mine was that the right hinge two screws that screw into the top cover (screen) had broken out of the plastic "tower" that the screws go into.
Close-ups of left hinge and right hinge.
Remove these screws and drill all the way through where these two screws are, making sure that the cover is angled up correctly so you don't accidentally drill through and into the keyboard part of the PowerBook. It is advisable to put a pin of some kind (paper clip?) or even the nuts and bolts you plan on using in the holes you are not working on to prevent undue stress on the remaining hinges as you work - or just take the cover off and work on it that way.
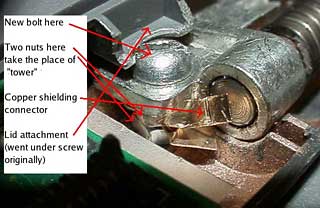 There is a
small copper piece that goes under one of the screws; watch how it
installs so you can get it back on. One of them I never did get back on
right, but it doesn't seem to matter. I can guess that the copper piece
has to do with minimizing electrical radiation and doesn't affect
performance.
There is a
small copper piece that goes under one of the screws; watch how it
installs so you can get it back on. One of them I never did get back on
right, but it doesn't seem to matter. I can guess that the copper piece
has to do with minimizing electrical radiation and doesn't affect
performance.
If the plastic "towers" the screws go into are broken, take a knife and cut off the remainder of the tower so it won't interfere with the small nuts and bolt you will install.
Put a couple of nuts or washers (experiment to get the number right; I used two small nuts) on the bolt after it goes through the metal part of the hinge as a support to replace the tower. You want the final height of the bolt head to be close to the same height as the original screw.
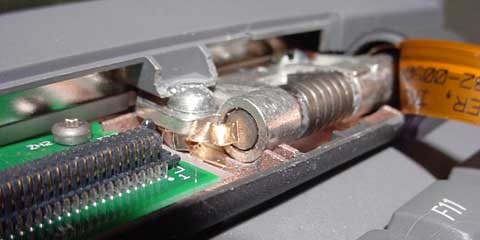
Make sure the bolts go all the way through the case and put nuts on them. If the bolts are too long, they can be ground off with a bench grinder, but do this right away so you don't forget and try to open the lid all the way and damage the keyboard part with the bolts sticking out the back.

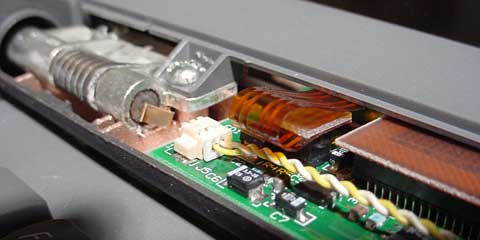
To do all of this, by the way, I took the lid off to allow me to work without worrying about damaging anything. There are three plug-in connectors in the lid that are easy to disconnect if you want to work with the lid off.
 On my PowerBook, the top
cover and the body were binding a bit before and after the hinge
repair, which didn't seem connected to the hinge issue. I just took a
pocket knife and trimmed some plastic off both the keyboard part and
the lid where it was binding. This isn't noticeable, as this area is
under the bottom of the screen where it is close to the body.
On my PowerBook, the top
cover and the body were binding a bit before and after the hinge
repair, which didn't seem connected to the hinge issue. I just took a
pocket knife and trimmed some plastic off both the keyboard part and
the lid where it was binding. This isn't noticeable, as this area is
under the bottom of the screen where it is close to the body.
The hinges work great now and feel really solid. Looking at the
screen with the Mac open, you can't tell anything was done - though, of
course, the nuts are visible with the cover closed.
![]()
Join us on Facebook, follow us on Twitter or Google+, or subscribe to our RSS news feed
Not sure if you should upgrade your old Mac or replace it? Check the Mac Daniel index to see if we've already addressed your problem.
Today's Links
- Mac of the Day: Performa 5200, introduced 1995.04. The first PowerPC all-in-one was also one of the worst Macs ever made.
- Support Low End Mac
Recent Content
About LEM Support Usage Privacy Contact
Follow Low End Mac on Twitter
Join Low End Mac on Facebook
Favorite Sites
MacSurfer
Cult of Mac
Shrine of Apple
MacInTouch
MyAppleMenu
InfoMac
The Mac Observer
Accelerate Your Mac
RetroMacCast
The Vintage Mac Museum
Deal Brothers
DealMac
Mac2Sell
Mac Driver Museum
JAG's House
System 6 Heaven
System 7 Today
the pickle's Low-End Mac FAQ
Affiliates
Amazon.com
The iTunes Store
PC Connection Express
Macgo Blu-ray Player
Parallels Desktop for Mac
eBay
![]()
