
2006 – Mac OS X 10.4 Tiger ships on DVD media, which is great if you have a Mac equipped with a DVD drive (as most of us do these days), since the entire set of installer files can be contained on one disc, eliminating the necessity of disc-swapping in the middle of the process.
However, there are certain older Macs that are officially supported by a Tiger (i.e., that have built-in FireWire) but don’t have optical drives that support DVDs – notably some low-end iBooks and early low-end eMacs.
My Late 2002 iBook G3/700 has only a CD-ROM drive, and some of the education-only Macs were also CD-only.
Mac OS X Version 10.4 (PPC) requires a Macintosh with:
- PowerPC G3, G4, or G5 processor
- Built-in FireWire
- At least 256 MB of physical RAM (512 MB recommended)
- A built-in display or a display connected to an Apple-supplied video card supported by your computer
- At least 3 GB of available space on your hard drive; 4 GB of disk space if you install Xcode 2 developer tools
- DVD drive for installation (or get CD media from Apple for $9.95)
There are several possible workarounds. Apple will let you send in your Tiger install DVD along with $9.95 (details here), and they will replace it with a set of OS X 10.4 install CDs. If you don’t intend on upgrading your hardware in the near future and have no Mac with a DVD drive available, that may be the most convenient solution.
Another possibility is to purchase or borrow a freestanding, bootable FireWire DVD drive and run the installer from it.
A third possibility is to mount your DVD-challenged computer as an external hard drive from a DVD drive-equipped Mac via FireWire Target Disk Mode and choose its hard drive as the destination disk in the OS X 10.4 installer. That is the method I chose for installing Tiger on my iBook, using my Pismo PowerBook‘s DVD drive.
FireWire Target Disk Mode is a great innovation, even better than PowerBook SCSI disk mode was back in the SCSI era. It’s usually used for fast file transfers between computers and is the speediest interface for doing that, but it also works well for system or disk maintenance that requires mounting the drive from another boot volume and, as in this case, for system installations.
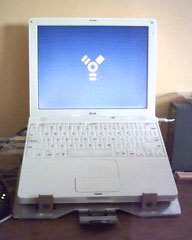 To put my iBook into Target Disk Mode, I shut it down, and connected it to the PowerBook using a standard 6-pin FireWire cable (the same on both ends) usually used for connecting my external FireWire hard drive. I then started the iBook while holding down the T key, and in a few seconds the yellow FireWire symbol began bouncing around on the screen.
When I woke up the PowerBook, icons representing the iBook’s three hard drive partitions were there on the Desktop.
I inserted the OS X 10.4 install disc in the PowerBook’s DVD drive and clicked the Install icon, which made the PowerBook reboot from the DVD. When the installer screen came up, the iBook’s partition volumes were among the alternatives presented as an install destination.
 The installation itself was straightforward. I chose to do an Archive and Install, and I checked the option to have the new system assimilate user settings from a former system, avoiding the tedium of going through the Setup Assistant routine.
In my case, I also chose not to install the 1.62 GB of printer drivers, the extra fonts, and the language support files in order to conserve hard drive space on the iBook’s 20 GB hard drive.
My basic installation took about 20 minutes. After the installer displays its “Installation Of Software Successfully Completed ” dialog, it wants to reboot into the new system it has just installed. I discovered no way to defeat this, so the Pismo rebooted from the iBook’s hard drive, which was interesting. No problems were encountered, though.
At that point I shut down both computers, disconnected the FireWire cable, and restarted each computers from its respective boot system.
In that instance, the Previous System Folder containing my old OS X 10.3.9 Panther installation turned out to be more than 5 GB, while the new Tiger system folder was less than 1.5 GB. That Panther (10.3.x) install actually dated back to my installation of OS X 10.2.3 Jaguar in January 2003, when the iBook was new and after I had partitioned the hard drive. It had only been updated since then – many times – never with a clean system reinstall.
Doing a clean installation (save for the imported settings), recovered 4 MB of free hard drive space. Emptying the Trash containing the Previous System Folder took nearly half an hour and deleted some 90,000 files!
Using this method proved to be a successful workaround for getting Tiger into my iBook, and I expect it would work for installing Tiger on older, officially unsupported Macs using the XPostFacto installer hack, although I can’t say for sure, having never tried it.
Further Reading
- Using FireWire Target Disk Mode to Install OS X on Macs Without DVD Drives, Charles W Moore, Miscellaneous Ramblings, 2006.09.14. Two methods for using FireWire Target Disk mode to install OS X on a Mac that can’t read DVDs.
Short link: http://goo.gl/qgf3yr
searchword: dvdchallenged
