
Apple’s Time Capsule, building the equivalents of an AirPort Extreme router and either a 500 GB or 1 TB hard drive into a single unit, is a space-saving and easy-to-use way for users to combine a wireless base station and storage accessible over a home or small business network – and even across the Internet.
However, many users already have either a wireless base station (also referred to as a wireless router) or an external hard drive – or both. And Time Capsule is a relatively expensive way to add storage, even when added to the price of Apple’s high-end AirPort Extreme.
Apple’s US online store lists the AirPort Extreme base station (with no built-in storage) for $179. A Time Capsule with a 500 GB drive boosts the price to $299; the 1 TB model jumps to $499.
I have an AirPort Extreme; until recently, I’d been connecting a generic 500 GB external USB drive to my iMac and using it to back up both the iMac and my MacBook using OS X 10.5’s Time Machine backup software. (See my article Time Machine Can Now Backup to a Shared Hard Drive.)
But backing up two Macs to that 500 GB drive, I’d started to run low on drive space. Dell Canada, however, had an external 1.5 GB drive on sale for C$150 (about US$130), which seemed like a nice price for quite a bit more storage space. Rather than connect it directly to the iMac, however, I thought I would see about connecting it to the AirPort Extreme’s built-in USB port, making what sometimes is referred to as an AirDisk.
Apple describes what it calls AirPort Disk as “a simple and convenient way to share files among everyone in your family, office, or class”, claiming “just connect the external hard drive to . . . your AirPort Extreme and – voilà”.
It’s not quite that simple, as I discovered. It is relatively straightforward, but there are a few under-documented things to be aware of along the way. (None of these steps are mentioned in the AirPort Extreme User Guide, for instance).
1. Partition the Drive for Mac Use
Like most external hard drives not specifically aimed at Mac users, the Dell drive – a Seagate FreeAgent model – came formatted as a Windows NTFS partition. (Seagate also offers FreeAgent models aimed at the Mac market.) That’s not a bad choice, making the drive instantly usable by the largest market segment, but it won’t be accessible connected to the AirPort Extreme.
Instead, the drive needs to be repartitioned using Apple’s Disk Utility. That means connecting it to a Mac’s USB port and opening the Disk Utility program (in Applications > Utilities). In Disk Utility, select the external drive and click on the Partition tab.
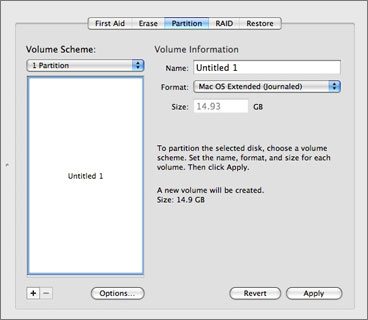
Click on Volume Scheme to drop down a list of options, selecting 1 Partition. Change the Format to Mac OS Extended (Journaled).
Thinking that was enough, I’d clicked Apply… but the resulting drive wasn’t actually usable. There’s one more step needed before partitioning and formatting the drive in this way. In that Disk Utility dialogue box, you need to click the Options… button.
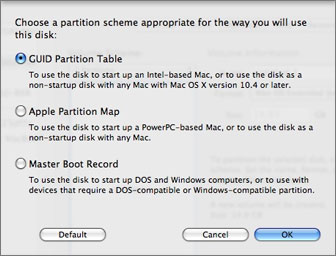
You’ll see that the disk is still set to use a DOS-style Master Boot Record. Change that setting to GUID Partition Table (for Intel-based Macs). Click OK to return to the main dialogue box window. Now you can apply the settings to create a Mac OS Extended Partition.
Now you can connect the disk to an AirPort Extreme’s USB port – or if you want to share both a hard drive (or hard drives) and a printer using the base station’s single USB port, you can use a USB hub to connect multiple USB devices. But your AirPort Extreme needs to be told to actually share the connected disk.
2. Tell Your Base Station About the Drive
You now need to use the AirPort Utility on a Mac to reconfigure your AirPort Extreme. Like the Disk Utility, you’ll find it in your Mac’s Applications > Utilities folder. When it opens, it should show you your AirPort Extreme in the left column. Click the Manual Setup button on the bottom of the window, then (after a moment), click on the Disks icon on the top.
You should see your connected disk listed, complete with whatever name you gave it in Disk Utility. Click on the File Sharing tab.
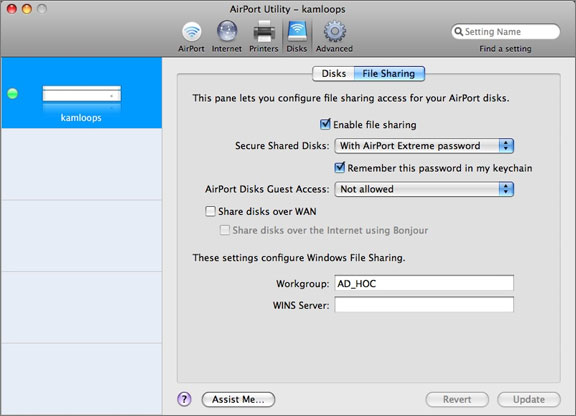
You’ll need to enable file sharing. Note the various password options; I chose to use the same password that I use to connect to the AirPort Extreme. There is also an option to connect over the Internet, which I haven’t experimented with, and to enable Windows File Sharing by entering a Windows workgroup name.
After making your changes, click the Update button. Note that your AirPort Extreme will restart, dropping any Internet or other connections for a few moments.
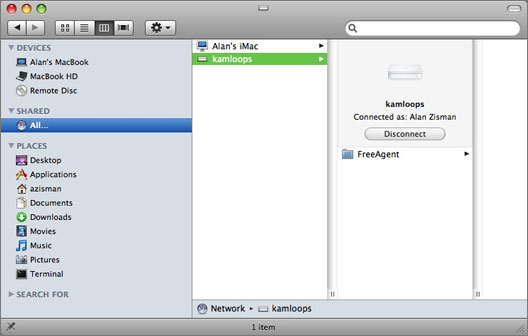
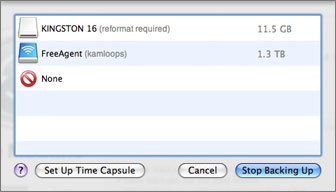
At this point, your AirDisk can be accessed from computers connecting to your AirPort Extreme. In the Finder, for instance, clicking on the Shared item in the sidebar, I see an All item; clicking on it, shows me that my iMac has a shared drive, as does my AirPort (named ‘kamloops’ in the screen capture image); clicking on that icon lets me connect to the shared FreeAgent drive.
But I want to do more – I want to be able to use Time Machine to back up my Macs to this drive. And again, it’s not quite as simple as just opening the Time Machine preference.
3. Make It Work with Time Machine
Even though the drive is being shared by my AirPort Extreme, I didn’t see it in Time Machine’s list of available disks. (To get that, open System Preferences and click on the Time Machine icon, or if you have a little Time Machine icon on the top menu bar, you can click it then select Open Time Machine Preferences from the dropdown menu).
![]() To make that drive appear in the Time Machine list, I first needed to go to the Finder and Connect to the shared drive so it will appear as an icon on the desktop. It will have a blue drive icon with the same wireless logo that Apple uses for its AirPort settings on the menu bar and other places.
To make that drive appear in the Time Machine list, I first needed to go to the Finder and Connect to the shared drive so it will appear as an icon on the desktop. It will have a blue drive icon with the same wireless logo that Apple uses for its AirPort settings on the menu bar and other places.
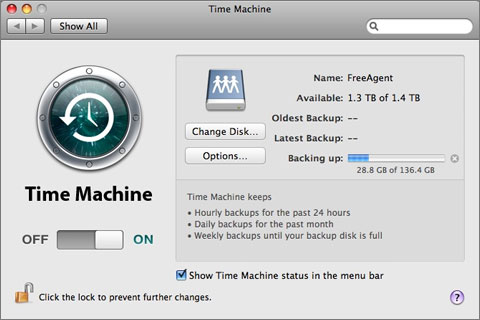
Your shared drive should now appear in the Time Machine preferences Choose Disk list.
From here on, it’s straightforward: You can select the shared disk, setting it for use for Time Machine backups. Note that Time Machine defaults to backing up every hour – I like the free TimeMachineEditor (see Free Time Machine Editor Does One Thing and Does It Well) to change that; in my case, I’ve set it to backup daily.
While I needed to have the shared disk’s icon on my desktop in order to select it in the Time Machine preference, Time Machine will happily continue to use that disk from then on, whether the icon is mounted on the desktop or not. While it is backing up, you’ll temporarily see a white backup drive icon on the Desktop.
Be patient – the first backup is going to take some time.
When using an AirDisk with Time Machine, you should be aware of several things:
- Backing up over a WiFi network is significantly slower than backing up to a disk that’s physically connected, or even to a disk that’s accessed across a wired ethernet network. For its first backup, my MacBook had a bit over a million files to backup, totaling 136 GB. I started at about 5 p.m. one evening; the backup finished the middle of the following morning, averaging about 8.5 GB per hour. Luckily, most subsequent backups deal with far fewer files and will only take a few moments.
- As with other Time Machine backups, if you have virtual OS software like Parallels Desktop, VMWare Fusion, or Virtual Box installed, you may want to exclude your virtual drives from the Time Machine backups – otherwise, every time you run the virtual systems, Time Machine will want to back up the entire multi-gigabyte files, since they’ve changed – even though the changes may be trivial
- As I described in my earlier article about using Time Machine with a shared drive, Time Machine creates a compressed “sparse bundle” file that contains all its backups. This is unlike what you’ll see if you use Time Machine to backup to a drive physically connected to your Mac – in that case, you’ll see individual folders for each recent backup with more easily accessible copies of the backed up files.
- Because of this, if you need to make use of your backup in case of an emergency (or purchase of a new Mac), you may have to again be patient – if you try to speed up the restore by physically connecting the backup drive to your Mac, I suspect you won’t be able to access the backup . . . the restore may need to be done the same way it was created – across the network, slowly. (Please let me know if I’m wrong about this. I would much prefer the speed and convenience of being able to restore with the drive physically connected).
Despite the speed issues, I find the convenience of having a large amount of inexpensive storage available to multiple computers makes using an AirDisk worthwhile.
Keywords: #timemachine #airporthub #wirelessbackup
Short link: http://goo.gl/10MOcx
searchwords: timemachine, airporthub, wirelessbackup
