Low End Mac Reviews
Superior Dithered Images with HyperDither
Dan Knight - 2008.07.16 - Tip Jar
Rating: 
Some programs seem to do a thousand different things. Others are one trick ponies.
![]() HyperDither falls
in the second category, and compared to image editing powerhouses like
Photoshop and even Photoshop Elements, its feature-set is incredibly
sparse. In fact, it only does one thing - it dithers images.
HyperDither falls
in the second category, and compared to image editing powerhouses like
Photoshop and even Photoshop Elements, its feature-set is incredibly
sparse. In fact, it only does one thing - it dithers images.
You may think that's nothing special, as even low-end programs like Photoshop Elements and GraphicConverter include a dithering option. Not only do they have a dithering option, but you can adjust it over a wide range of settings. Some may appear sharper than others. Some may appear smoother than others. And you can spend quite a bit of time adjusting the slider.
HyperDither eliminates all of that bother. You launch the program, drag an image to it, and it dithers it. You have precisely two options: sharpen the image and change contrast. Sharpen is on or off. Contrast is normal or higher (higher usually looks better). There is no step 3.
If Photoshop can already dither, why bother with HyperDither - even though it's free? Because it does one thing, and it does it better than Photoshop.
John Balestrieri, the programmer behind HyperDither, rediscovered the dithering algorithm developed by Bill Atkinson, the father of MacPaint, QuickDraw, and HyperCard. This routine produces a sharper, smoother dithered image than the Floyd-Steinberg filter that Photoshop uses. "Atkinson dithering" was last used in Apple's HyperScan software and was pretty much forgotten after that.
But Balestrieri didn't forget it, and he contacted Atkinson in January 2003 to ask for details of his algorithm. Atkinson was more than happy to provide the routine, and that became the basis of HyperDither, which is now at version 1.2.
How well does it work in practice? Very well indeed!
A while back a reader emailed me a high resolution color photo of his Mac 128K demo at the Orlando Apple Store. I included a reduced color version of that photo and then created a dithered version at 512 x 342 pixels, the same resolution as the original Mac's display, using Photoshop Elements.
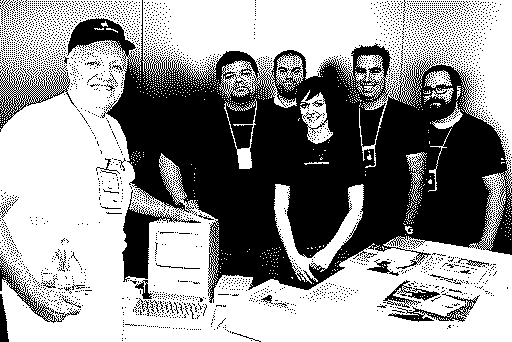
Image dithered in Photoshop Elements.
I fiddled around quite a bit with the slider - and ended up exactly where I started, at 88%. I thought it looked pretty nice. Well, until I did the same thing in HyperDither. Using the default settings, I ended up with the image below:

Image dithered in HyperDither with default settings.
You can see a lot more detail: the Mac itself isn't washed out, the wall in the background has smoother gradients, and you can better make out the T-shirts and magazine covers. The only drawback compared with the Photoshop version is that the faces are not nearly as sharp.
Time to use HyperDither's sharpen filter:
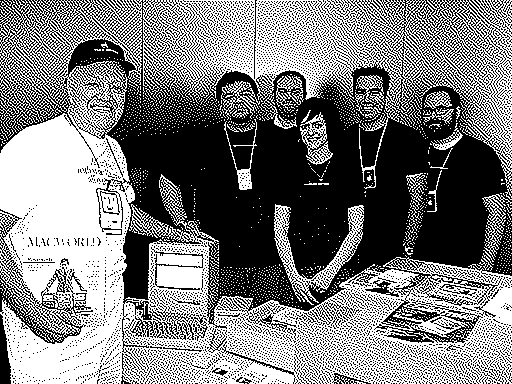
Image dithered in HyperDither with increased sharpness.
We've regained the facial detail lost in the default HyperDither scan, retain the smoother gradients that Photoshop lost, and have cleaner edges than either of the earlier images. If anything, it may sharpen a bit too much, but overall this is a great image.
Why Dither?
Dithering is a neat way of creating images that look like they belong on an ancient Mac with a 1-bit black and white display, but there's another reason dithering can be useful.
Have you ever printed out a document with a photo in it and then made photocopies for that document? If so, you've probably noticed that the image tends to get darker, increase in contrast, and sometimes lose smooth gradients. As Jeff Adkins pointed out in Preparing Images for Better Reproduction on Laser Printers and Photocopiers, by using a dithered image in your original, you can minimize or even eliminate the problem of copies getting darker, gaining contrast, and loosing smooth gradients.
In his article, Adkins suggested taking your image, opening it in GraphicConverter, resizing it to exactly the size it will be when printed, and choosing to dither it at 600 dpi resolution. That worked pretty well.
Now we have an even better tool. Here are the steps I would take:
- Open the image in the image editor of your choosing. I use Photoshop Elements, but almost anything will do.
- If necessary, do a little image fixing, maybe adjusting the color, fiddling with contrast, etc.
- Resize the image to the exact size it will be when printed and set resolution to one your printer easily supports (that might be 300 dpi, 360 dpi, 600 dpi, or at most 720 dpi). You don't want to go too high or the copier may have problems with such small dots.
- Save the image, preferably with a new name so you don't overwrite the original.
- Launch HyperDither and drag your image to it.
- Fiddle with contrast and sharpness to see if another setting works better.
- Save your image. (HyperDither saves as PNG.)
Now print it out, take the printed page to the copier, and make a copy. It should look nearly identical to the original.
Thoughts on HyperDither
This is a remarkably simple program - drag, drop, adjust, save. It has precisely two options: contrast and sharpness. It produces great dithered images and doesn't cost a penny.
There is room for improvement. It would be nice if it had two more Save options: GIF for use on the Web (some older HTML editors such as Claris Home Page corrupt uloaded PNGs) and PICT for use with old Macs that don't support PNG. You can use another image editing program or Preview to make the conversion, but it would be nice if you could avoid the extra step.
It would also be nice if you could change the image size and resolution, as well as contrast and brightness, within HyperDither. That would eliminate the need to do that work before dragging your image into HyperDither. With that, it would be a one stop dithering solution.
HyperDither does what it does very well, and while there are a few features that could be added to make it even more useful, that doesn't detract from what it does. Adding GIF export would be icing on the cake (the GIF algorithm has been free from patent protection since late 2006).
For its elegant simplicity and the quality of the images it
produces, HyperDither earns 3-1/2 LEMs. It's nearly perfect and has
little room for improvement. ![]()
Manufacturers and distributors: Interested in having your product reviewed? Please read our review policy.
Join us on Facebook, follow us on Twitter or Google+, or subscribe to our RSS news feed
Today's Links
- Mac of the Day: PowerBook 190cs, introduced 1995.08.28. The last 680x0-based PowerBook could take a PowerPC upgrade.
- Support Low End Mac
Recent Content
About LEM Support Usage Privacy Contact
Follow Low End Mac on Twitter
Join Low End Mac on Facebook
Favorite Sites
MacSurfer
Cult of Mac
Shrine of Apple
MacInTouch
MyAppleMenu
InfoMac
The Mac Observer
Accelerate Your Mac
RetroMacCast
The Vintage Mac Museum
Deal Brothers
DealMac
Mac2Sell
Mac Driver Museum
JAG's House
System 6 Heaven
System 7 Today
the pickle's Low-End Mac FAQ
Affiliates
Amazon.com
The iTunes Store
PC Connection Express
Macgo Blu-ray Player
Parallels Desktop for Mac
eBay
![]()
