Miscellaneous Ramblings
Make a Bootable OS X Emergency CD with BootCD
A 'Best of Miscellaneous Ramblings' Column
Charles Moore - 2005.01.26 - Tip Jar
Since this article was first published, BootCD has been discontinued. It should be considered obsolete, since it is not compatible with Mac OS X 10.4 or later.
One thing you always wanted to have on hand in the old days was a Disk Tools floppy for booting your Mac when trouble reared its ugly head. The Disk Tools floppy was a holdover from the days when Macs could boot from floppy disks. On floppy-drive equipped Macs, putting a bootable floppy in the floppy drive took precedence as the default boot volume.
This came to an end when even a stripped-down skeleton of the Mac OS became too large to fit on a 1.4 MB floppy. The last Disk Tools floppies had Mac OS 8.1 on them, and you can still download the disk image to make one from Apple's support site. Boot floppies have saved my bacon many times.
Bootable CDs replaced Disk Tools floppies. These were pretty easy to make for Mac OS 8.6 through 9.2.2. You could simply burn a copy of the System Folder from your hard drive onto a CD. The System Restore CDs that shipped with Macs are also bootable, and Low End Mac has explained How to Make a Bootable Restore CD and How to Make a Bootable Emergency CD with the Classic Mac OS.
However, things got more complicated in the OS X era. OS X installations are a complex procedure, and you can no longer simply drag the System around the way you could with the Classic Mac OS. OS X install CDs are bootable, of course, and they contain Apple Disk Utility, but it would be nice to have a CD equivalent of the old Disk Tools floppy, which had a bootable system and Disk First Aid (a diagnostic and repair utility) and the HD/SCSI Setup or Drive Setup (for disk formatting).
Well, now you can, thanks to a cool little donationware utility called BootCD.
BootCD is a Cocoa app that creates a disk image that can be used to burn a Mac OS X boot CD with a working Finder and Dock on it. BootCD is unfinished and still has some flaws, but it works. The current version works much better than previous versions and includes the ability to run Drive10 and other utilities, although Norton does not yet work from the CD.
Making a bootable CD with BootCD is relatively simple:
- Launch BootCD.
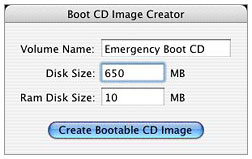 Choose a name for the CD and
enter it in the "Volume Name" field.
Choose a name for the CD and
enter it in the "Volume Name" field.- If you will be burning to a CD of a different size than 650 MB, enter the size of the CD in the "Disk Size" field. If you need a larger RAM Disk than the default size, enter the size you want in the "RAM Disk Size" field. Otherwise, you can feel free to leave these fields alone. I used a 700 MB CD-R but used the default RAM Disk size. Increasing the size of the RAM Disk will not improve CD boot time. It only needs to be done if the RAM Disk becomes full when the boot CD is used with a smaller RAM Disk. If you want to add things to the RAM Disk, drag them to the folder etc/RamDisk/contents on the disk. Obviously, you shouldn't put so many files in there that the size of the folder exceeds the RAM Disk size that you have chosen in BootCD.
- Click the "Create Bootable CD Image" button.
- When prompted, enter an administrator username and password.
 Choose a location to save the
disk image in the Save dialog box that appears.
Choose a location to save the
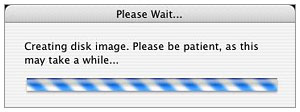
disk image in the Save dialog box that appears.- Wait while BootCD creates and prepares the image. This can take anywhere from about 8 to 15 minutes. With my 550 MHz G4 PowerBook (an upgraded Pismo) it took more like 15 minutes.
- Eventually, a dialog box appears telling you to choose the
applications you wish to have on the disk. You can choose as many
applications as you wish via the
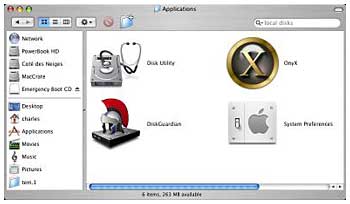
 Open dialog box that appears. I decided to put on copies of
Disk Guardian and OnyX. I don't have an
OS X version of Disk
Warrior. BootCD automatically includes these applications on the CD
image: System Preferences, Terminal, Disk Utility, and Console.
Open dialog box that appears. I decided to put on copies of
Disk Guardian and OnyX. I don't have an
OS X version of Disk
Warrior. BootCD automatically includes these applications on the CD
image: System Preferences, Terminal, Disk Utility, and Console.
Note that you need stand-alone, self-contained applications such as DiskWarrior; this will not work for Norton, which leaves files all over the hard drive that need to be copied to the image and will not be copied simply by copying the app itself. 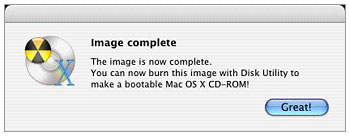 BootCD should finish with a
message telling you that you now have a bootable CD image. The image
should dismount. Quit BootCD.
BootCD should finish with a
message telling you that you now have a bootable CD image. The image
should dismount. Quit BootCD.- If you wish to make any further modifications to the image before burning, such as adding command-line tools, frameworks, etc., you can remount the image, make your changes, and then dismount the image. The disk image must be unmounted when you burn it. You may mount the disk image to add files to the image before burning, but you must unmount the disk before you burn the CD.
- Open Disk Utility. Choose "Burn..." from the Images menu. It is recommended that you use Disk Utility to burn the CD. Burning the CD with Toast is not supported and is likely to result in a non-bootable CD. If your CD burner is not supported by Disk Utility and you must use Toast, be sure to burn the disk image directly to the CD. Do not use the "Data" pane and add files to the CD or you will get permission errors while burning, and you will end up with a non-bootable CD. Additionally, it is not possible to burn the disk image with Toast Lite. If you wish to use Toast, you must use Toast Deluxe, as Toast Lite does not have the option to burn a disk image directly to a CD.
- Choose the image created by BootCD in the Open dialog box that appears and insert a blank CD in your CD burner.
- Wait about 15 minutes for the image to burn. Mine actually tool a little longer in an 24x (CD-R) FastMac SuperDrive.
- You should now have a Mac OS X bootable CD.
 I did. It booted my iBook just fine,
although it took 10 minutes or so to boot, reminding me how much I hate
booting from CDs (or floppies).
I did. It booted my iBook just fine,
although it took 10 minutes or so to boot, reminding me how much I hate
booting from CDs (or floppies).
To boot from your Mac OS X emergency bootable CD:
- Insert the CD in your internal CD drive and restart your Mac while holding down the 'C' key.
- Wait for the CD to boot. (Time for a snack?)
- When booting is finished, the Finder will appear with the Dock and all the applications you chose while running BootCD. Your disks should be mounted on the Desktop - and so they were.
BootCD worked for me exactly as advertised and was completely straightforward and user-friendly. This is a nice little piece of software.
However, my mode of choice for alternate system booting is to have another bootable system on another partition of the hard drive. With my current OS X machines, both of which support dual booting, Mac OS 9.2.2 serves nicely as an alternate boot system and doubles as Classic Mode support.
My next Mac will have two copies of OS X on separate partitions.
But for real emergencies, should both hard drive systems get simultaneously corrupted, having the Emergency Boot CD would be handy.
System requirements:
- BootCD, version 0.6, works with Mac OS X 10.3.x (Panther).
- BootCD version 0.5.4 for Mac OS X 10.2.0 through 10.2.8 (Jaguar).
- BootCD version 0.3 for Mac OS X 10.1.5 and earlier.
- BSD subsystem installed (default OS X installation satisfies this condition)
BootCD is donationware.
Notes
If an app asks you to enter an administrator password while booted from the CD, the username to use is 'root' and the password is 'bootcd' (in both cases, without the quotes).
BootCD automatically includes these applications on the CD image: System Preferences, Terminal, Disk Utility, and Console. It's not necessary to manually include these applications.
If you want to add additional files such as preference files, command line tools, etc. to the disk image after creating it, all that is necessary is to mount the disk image and copy the files using either the Finder or the Terminal.
Carbon Copy Cloner requires the following item, which is not put on the boot CD by default: /System/Library/Perl. If you wish to use Carbon Copy Cloner from a boot CD, be sure to copy this folder to the equivalent location on the boot CD using the method described above.
The location of files that will be put on the RAM disk at boot time is at this path on the CD image: private/etc/RamDisk/contents
The location of root's user folder on the boot CD is: private/etc/RamDisk/contents/private/var/root/
BootCD requires that the BSD subsystem be installed. If you do not have the BSD subsystem, be sure to install it from the OS X Install CD before running BootCD.
Booting from a CD is inherently slow. Optimizing the disk image with a disk utility such as Norton Speed Disk, Alsoft PlusOptimizer, or Micromat TechTool Pro may improve performance.
Do not try to burn the CD using the Finder's standard CD burning features. You must burn the image directly through one of the applications designed for this purpose (Disk Utility strongly recommended), not by dragging files on to a CD-R icon.
CORRECTION: Onyx and most disk utilities cannot be run from a CD-ROM. If you know of a utility that will, please contact the author so we can note that here. Thank you.
Join us on Facebook, follow us on Twitter or Google+, or subscribe to our RSS news feed
Charles Moore has been a freelance journalist since 1987 and began writing for Mac websites in May 1998. His The Road Warrior column was a regular feature on MacOpinion, he is news editor at Applelinks.com and a columnist at MacPrices.net. If you find his articles helpful, please consider making a donation to his tip jar.
Links for the Day
- Mac of the Day: PowerBook 190cs, introduced 1995.08.28. The last 680x0-based PowerBook could take a PowerPC upgrade.
- Support Low End Mac
Recent Content
About LEM Support Usage Privacy Contact
Follow Low End Mac on Twitter
Join Low End Mac on Facebook
Favorite Sites
MacSurfer
Cult of Mac
Shrine of Apple
MacInTouch
MyAppleMenu
InfoMac
The Mac Observer
Accelerate Your Mac
RetroMacCast
The Vintage Mac Museum
Deal Brothers
DealMac
Mac2Sell
Mac Driver Museum
JAG's House
System 6 Heaven
System 7 Today
the pickle's Low-End Mac FAQ
Affiliates
Amazon.com
The iTunes Store
PC Connection Express
Macgo Blu-ray Player
Parallels Desktop for Mac
eBay
![]()
