Miscellaneous Ramblings
Configuring Four Popular Mac Email Clients
Charles Moore - 2001.10.17 - Tip Jar
Configuring your email client so that it can send and receive messages is a task that confounds many new computer users - and quite a few veterans as well. It's not so much that it's difficult, but it tends to be counterintuitive, and the procedure for doing it varies substantially from client to client.
Here is a how-to or refresher on configuring four popular Mac OS email clients.
First, you need to gather the necessary information, which is supplied by your Internet Service Provider or third-party email service. Basically what you need are:
- A user name, e.g.: cwmoore
- An email address, e.g.: cwmoore@isp.com
- A POP server (incoming mail) address, e.g.: pop.isp.com
- An but outgoing server (SMTP) address, e.g.: smtp.isp.net
- A password
I suggest that you make a dedicated document or database entry to record this information for each email account that you have so you will be able to find it easily for future reference if you get a new email client, need to reconfigure your present one, or change computers.
Eudora 5.1
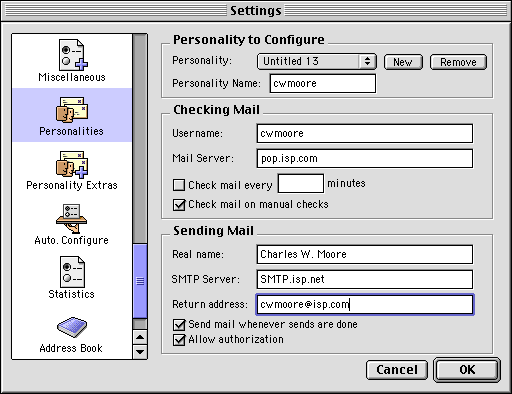
- Go to the Special menu and select "Settings."
- In the window to the left of the dialog box that peers, scroll down to "Personalities" (sixth from the bottom) and click on the icon.
- In the top field of the dialog that appears on the right, click "New."
- Fill in your username and mail server address in the "Checking Mail" fields, and check or uncheck the two check boxes as desired.
- In the "Sending Mail" field, fill in your real name, your outgoing (SMTP) server address, and your return address (likely just your email address for this account). Again, check either or both of the two check boxes as applicable. For instance, if your ISP or email service demands authorization (SMTP authentication), check the "Allow Authorization" checkbox.
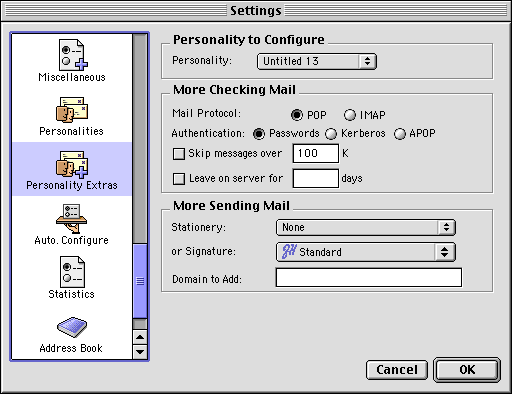
- Now click on the "Personality Extras" icon in the left hand window.
- In the "More Checking Mail" field choose either POP or IMAP (usually POP); the sort of authentication (usually passwords); and your desired configuration of the to checkboxes. You can also configure stationery boilerplate and a signature if desired in the "More Sending Mail" field.
- Check "OK" when you are done.
- When you go online to check your mail, Eudora will prompt you for a password. You can choose to have the program remember your password in the future.
Nisus Email 1.5
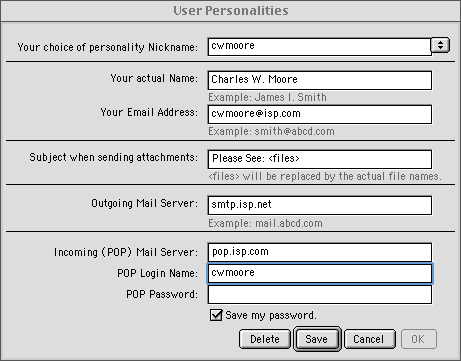
- From the "Personalities" menu, select "New. "
- Enter the pertinent information in the fields of the "User Personalities" dialog box that it appears, which is extraordinarily straightforward in this application.
- Click "Save," then "OK," and you're up and running.
SweetMail

- From the File menu, select "Account."
- Check the "New" button on the lower left and enter the account name in the upper left-hand field.
- Click the "Address" tab if it's not already selected. Enter your account information in the appropriate fields, including your password.
- Click the "Receive" tab, and configure the checkboxes as desired. The "Send" tab also includes a very convenient checkbox option to automatically POP authenticate before sending. Click "OK" and you're done.
Netscape 6.1/Mozilla
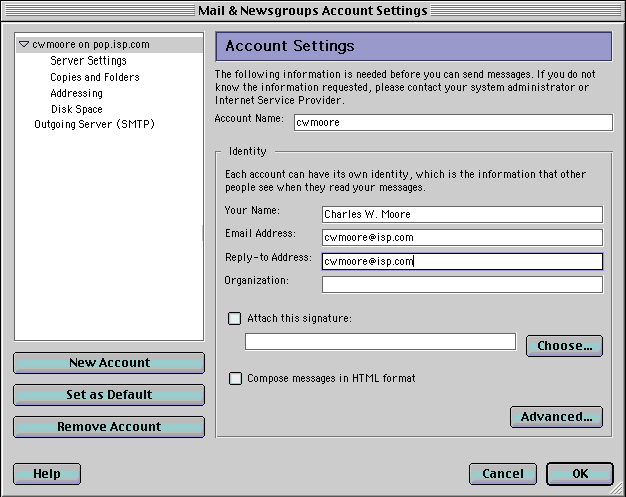
- From the Tasks menu, select "Mail & Newgroups." From the Edit menu, select "Mail & Newgroups Account Settings."
- Check the "New Account" button in the left-hand column. The "Account Wizard" dialog will appear. Click the ISP or Mail Provider radio button, and click "Next."
- In the "Identity" window that appears, fill in your name and email address. Click "Next."
- In the "Server Information" dialog, click the ether the POP or IMAP radio button (usually POP), and enter your mail server name. Click "Next."
- In the "User Name" dialog, fill in your username. Click "Next."
- In the "Account Name" dialog, enter your account name. Click "Next" and confirm the information. Click "Finish."
- In the main "Account Settings" window, enter your email address and return address, a signature message if desired, and I appeal to you to unclick the "Compose Messages in HTML Format" checkbox.
- In the left hand window, click on "Outgoing Server (SMTP)." The "Outgoing Server (SMTP) Settings" dialog will appear on the right. Enter your SMTP server address, and select the appropriate password and security options.
- By checking on the various topics in the left hand dialog window, you can configure your Copies and Folders, Addressing, and Disk Space options as desired. Click "OK" and you're done.
Join us on Facebook, follow us on Twitter or Google+, or subscribe to our RSS news feed
Charles Moore has been a freelance journalist since 1987 and began writing for Mac websites in May 1998. His The Road Warrior column was a regular feature on MacOpinion, he is news editor at Applelinks.com and a columnist at MacPrices.net. If you find his articles helpful, please consider making a donation to his tip jar.
Links for the Day
- Mac of the Day: PowerBook 500 Series, introduced 1994.05.16. 'Blackbird' includes a 25 to 33 MHz 68040 along with smart batteries and grayscale or color displays.
- Support Low End Mac
Recent Content
About LEM Support Usage Privacy Contact
Follow Low End Mac on Twitter
Join Low End Mac on Facebook
Favorite Sites
MacSurfer
Cult of Mac
Shrine of Apple
MacInTouch
MyAppleMenu
InfoMac
The Mac Observer
Accelerate Your Mac
RetroMacCast
The Vintage Mac Museum
Deal Brothers
DealMac
Mac2Sell
Mac Driver Museum
JAG's House
System 6 Heaven
System 7 Today
the pickle's Low-End Mac FAQ
Affiliates
Amazon.com
The iTunes Store
PC Connection Express
Macgo Blu-ray Player
Parallels Desktop for Mac
eBay
![]()
