
My track record with eMacs has not been the greatest. My first was a 700 MHz with a Combo drive. I purchased it refurbished after the second generation eMacs came out, which meant I got a great deal on it – and Apple’s one-year warranty. Good thing, as it ended up in the service department when it simply refused to boot.
A few years ago, I picked up a pair of 1.25 GHz eMacs, one with a Combo drive and one with a SuperDrive. I sold the 700 MHz eMac to my oldest son.
The Combo drive in one of the 1.25 GHz models died out of warranty, so I replaced it with a 16x dual layer Pioneer SuperDrive.
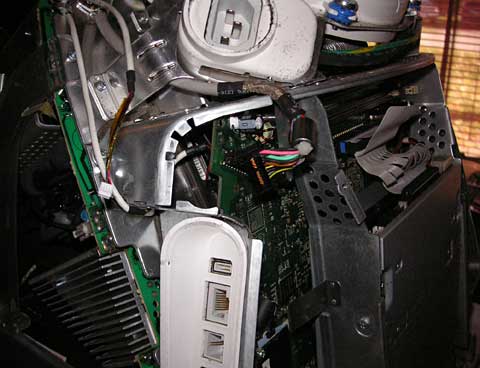
The other eMac has had inexplicable problems for almost a year, and it wasn’t until last week that I finally figured it out. One of the FireWire ports had broken – snapped off and sitting loose until I unplugged a FireWire cable. Then part of the plug came out with the cable (photo below). Good thing it has two FireWire ports, but it would still lock up at any time. My plan was to snip out the contacts and hope for the best.
Then the other eMac died. Monday night the screen got dim and took on a strong magenta shift. Contrast was horrid, and Tuesday morning the screen was completely dark. I’m beginning to wonder if eMacs have reliability issues – or am I just unlucky?
I told my wife what I planned to do when we discovered the problem late Monday night and found that a restart didn’t help at all. (Not that I expected it too. Sometimes you just know it’s a hardware problem.) Tuesday afternoon, after doing the daily site updates and eating lunch, we cleared the dining room table, put down a tablecloth to protect it, and I carried the two 50 lb. eMacs from our offices.
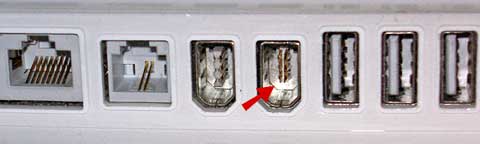
The broken FireWire port in one of my eMacs.
You need just a couple tools to take apart an eMac: the right Allen wrench/hex key (2.5mm or 3/32″) and a #2 Phillips screwdriver, preferably magnetized, as you will undoubtedly have a few screws fall into the computer. And find a good take-apart guide: Paul Wilkinson’s Replacing an eMac Optical Drive is a good starting point, even if you have a different model. We have more links at the end of this article.

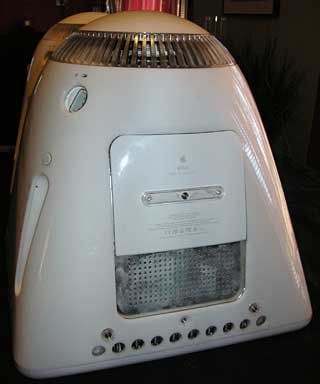
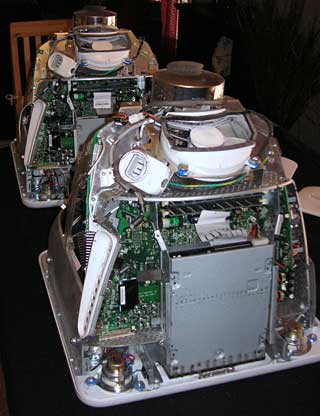
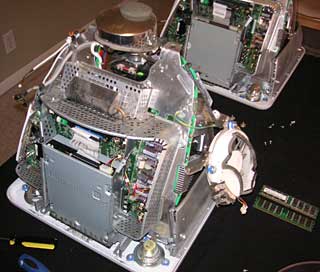
eMacs ready for disassembly (left) and memory bay cover (right).
Start by setting your eMac screen down on a clean, flat, sturdy work surface. These things weigh 50 lb. You’ll probably discover that your eMac is positively dirty, especially around the cooling vents at the back of the computer – and it gets even worse once you’re inside.
If you have the tilt-swivel base, removing it (using the 2.5mm Allen wrench) is the first step. Then there are the Allen bolts of unusual size – two on the top, two on each side, and one on the bottom (unless you removed it to attach the base) – and a couple of feet on the bottom that require a Phillips screwdriver.
CRT Warning: CRTs can store a bit of a charge, but the greater danger is from the high voltage circuitry. To avoid a potentially deadly jolt, be sure the computer is turned off and the power cord disconnected. Manually discharging a CRT can be dangerous, as it increases the odds of getting zapped by the high voltage circuitry. The best advice is to unplug, let it sit for a while, not touch any electrical connectors to the CRT, and avoid any big capacitors as though your life depends on it. For more on this subject, we recommend The Truth About CRTs and Shock Danger by Prof. Thomas H. Lee of Stanford University
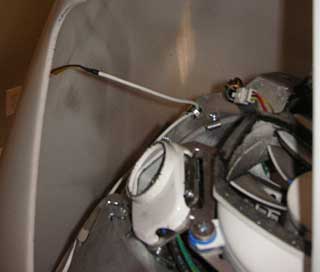
The wire to the power button (left) and the shield at the bottom of the eMac (right).
The great white housing lifts off easily, but take a moment to disconnect the wire going to the back of the power button. (You’ll also want to make sure to reconnect it, something I’ve forgotten more than once when reassembling an eMac.) Odds are that the inside of the housing will be quite dirty, and you can use the usual cleaning supplies to wipe it fairly clean.
There’s a stamped metal cover protecting and shielding the bottom of the computer, and this will probably be even dirtier than the eMac’s enclosure. This shield can often be removed by hand after taking out four Phillips screws, but you might need to use a flathead screwdriver to loose the two clips that keep it in place. And now you get to see the real guts of the eMac.
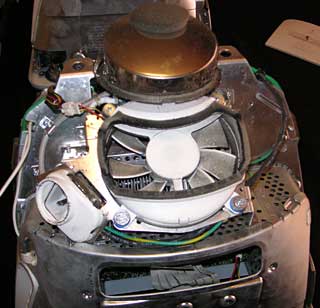
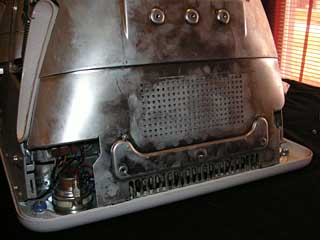
Bottom of eMac with shield removed (left) and the eMac’s cooling fan (right).
At the bottom is the optical drive, then the motherboard, then the hard drive. All of these are connected, and you’ll need to remove the fan assembly to remove it. That involves unscrewing four or five screws, and I just let the fan dangle on the side of the eMac while I work.
Be sure to disconnect this cable to the monitor.
Don’t remove the two screws that hold the hard drive assembly to the motherboard chassis, as it’s easier to remove this whole assembly together. There are quite a few screws holding it in place, including a couple of big ones that bolt it to the front of the eMac.
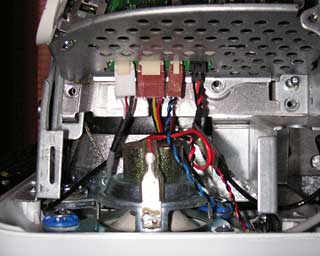
Fan dangling on side of eMac (left) and wires near the left speaker (right).
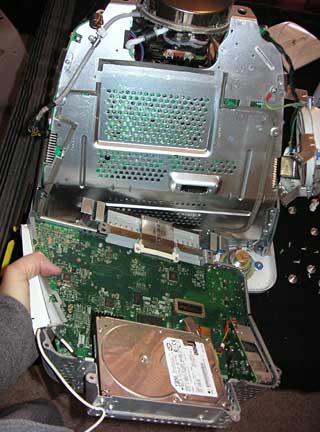
Removing the logic board chassis.
There’s also a set of wires near the left (from the bottom) speaker, and if you have an AirPort Extreme card, it has a wire to the antenna. Disconnect all of these wires before removing the logic board chassis.
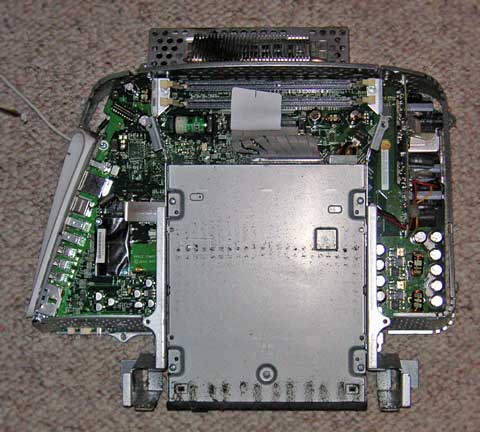
Bottom view of logic board chassis with optical drive.

Top view of logic board chassis with hard drive.
Looking closer at the logic board, I discovered that the same two capacitors are leaking on both eMacs.
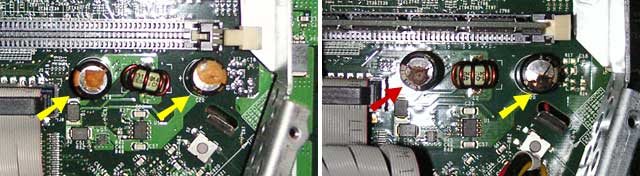
Both eMac logic boards have two leaky capacitors in the same location.
When reassembling the eMac, don’t forget to reconnect the video cable, the wires near the speaker, the AirPort Express antenna (if you have an AirPort Express card), and the wire leading to the power button. Failure to do that means taking the eMac open again after you’ve set it back up and discovered that you can’t turn it on, have no image, have no sound, or have no WiFi.
After taking both eMacs apart, I combined the motherboard, optical drive, and hard drive from the eMac my wife had been using with the rest of the eMac with the broken FireWire port. All told, it took less than 90 minutes to disassemble both eMacs, take these photos, and get my wife up and running again with the same core computer she’d been using. Basically this was a very convoluted monitor swap.
With CRT and logic board problems, I’m not going to try to fix the other eMac. I’ve pulled the RAM, which is the same as in my MDD Power Mac G4/1 GHz dual, and that computer has now been upgraded from 1.75 GB to 2.0 GB – leaving me with a pair of 256 MB PC2700 modules. I’ve also got a spare Apple 8x SuperDrive and one more 80 GB 7200 rpm hard drive for my growing collection (great to put in a FireWire enclosure and load with a different version of OS X or use as a spare drive for iMovie/iDVD projects).
Time to upgrade an old Mac or two….
eMac Take Apart Guides
- Upgrading Apple eMac, L Bodnar
- The Silent 3rd Generation eMac, Applefritter
- Replacing an eMac Optical Drive, Paul Wilkinson
- eMac (1st Gen.) Disassembly, in Japanese
Keywords: #emac
Short link: http://goo.gl/8A0bRr
searchword: 1emacfrom2
