
Remove Red Eye in Photoshop in Five Easy Steps
- 2005.10.19
Taking pictures is a pleasure. Heck, digital photography is a perfectly enjoyable activity, especially because of the extra flexibility when it comes to transferring photos to a computer and manipulating them before printing.
On the other hand, you sometimes face this issue - people whose eyes turn red because of the camera's flash.
If you use Photoshop, there's a way to fix this. Let's go through a very simple five-step tutorial that allows you to take a red eye and "get the red out".
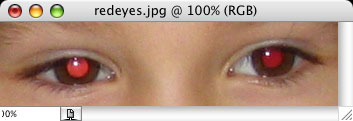
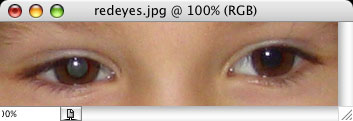
Original image with red eye
Step One: Create an Ordinary Layer
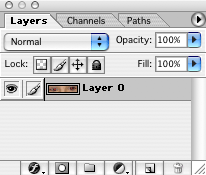
Open the original picture with Photoshop and look at the small Layers window. Normally - in most cases (if not all) - a picture downloaded from your digital camera will come with nothing but a "background" layer. Double click on that layer. A window will pop up. All you have to do is to click on OK. Rename the layer if you want to, but it really is optional.
Step Two: Create an Adjustment Layer
This is the centerpiece of the tutorial, because creating an adjustment layer paves the way for the elimination of the wrong color. Pull down the Layer menu, and point your mouse to the New Adjustment Layer element. Several choices will appear in a submenu, and you have to select Channel Mixer and click on OK without making any change.
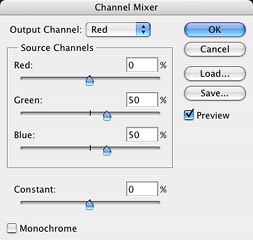 Step Three: Adjust the
Channel Mixer
Step Three: Adjust the
Channel Mixer
Now, you are about to do something that will radically change the colors of your picture. Do not worry about it, this step is necessary. Everything will sort itself out with the next two steps.
In the Channel Mixer window, make sure that the Output Channel popup menu is set to Red. Then, take the Red slider and bring it back to 0%. The Blue and Green colors should both be set to 50%.
After adjusting the three colors, click on OK.
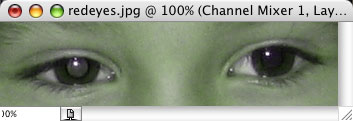
The Adjustment layer
Step Four: Paint It Black
In the small Layers window, take a look at your adjustment layer, which should be the first layer on top. Click once on the small rectangle on the right - that is the mask - and in the Tools window, select the Paint Bucket. Make sure that your paint color is black before going further.
Everything will seemingly go back to square one, red eyes included. Don't worry, that's not the case. The last step will provide the desired result.
Step Five: Kill the Red
Now choose the Brush tool and paint the red part of the eye using white (not black). If you take your time and use a small brush size, this can be done with a mouse. The red eye will turn into a perfectly normal eye, preserving the normal lighting that makes it shine.
After removing the red
Pull down the Layer menu and choose Flatten Image - and don't forget to save the new file.
Not only are you a talented photographer, but now you can
eliminate one of photography's biggest enemies by taking the red
out of any eye. Isn't that a great feeling? ![]()
Join us on Facebook, follow us on Twitter or Google+, or subscribe to our RSS news feed
Michel Munger is a journalist who lives in Montréal. He discovered the Mac in 1994, and his work on a PC reminds him every day why he embraced Apple's platform. Munger has also authored some MacDaniel columns.
You can learn more about him on his personal website.
Today's Links
- Mac of the Day: PowerBook 500 Series, introduced 1994.05.16. 'Blackbird' includes a 25 to 33 MHz 68040 along with smart batteries and grayscale or color displays.
- June 9 in LEM history: 99: WebMate - Cal State going Windows - 00: The suitability of G3 upgrades for gaming - Internet radio - Dr. Mouse Ergonomic Mouse - Using the Espy font - 03: Free POP3 email services - 04: Power Macintosh G5/2.5 GHz - June 2004 Power Mac G5 value equation - 06: Apple's great Asteroid hoax - PB 1400 'Volvo of laptops' - Time to switch from OS 9 - Pimp my SE/30
- Support Low End Mac
About LEM Support Usage Privacy Contact
Follow Low End Mac on Twitter
Join Low End Mac on Facebook
Favorite Sites
MacSurfer
Cult of Mac
Shrine of Apple
MacInTouch
MyAppleMenu
InfoMac
The Mac Observer
Accelerate Your Mac
RetroMacCast
The Vintage Mac Museum
Deal Brothers
DealMac
Mac2Sell
Mac Driver Museum
JAG's House
System 6 Heaven
System 7 Today
the pickle's Low-End Mac FAQ
Affiliates
Amazon.com
The iTunes Store
PC Connection Express
Macgo Blu-ray Player
Parallels Desktop for Mac
eBay
![]()
