
2001 – Now that you know how to import and organize a library of MP3 files, you may want to take advantage of a very powerful feature offered in iTunes: CD burning.
If you combine iTune’s organization and customization features with the ability to create your own music CDs, iTunes is a great mastering environment.
When you install it, iTunes has lots of authoring support, but to complement it well and support virtually any CD recorder drive, you have to install Disc Burner, another free download from Apple. Download, install, and restart. Now you are ready for a great experience.
Before You Start
Most MP3 files offer poor audio quality. If you are to create your own CD and play it on your Discman, home stereo, or other people’s equipment, you want quality to really enjoy the music. We discussed 128 kbps and 192 kbps encoding last week. That’s adequate for inexpensive computer speakers, but it will sound like crap in a real-time CD player or a stereo with standard quality speakers. To ensure quality recording, you need to encode your tracks with nothing but the best.
Of course, optimal quality encoding will hog lots of hard disk space. This is why I recommend that you import the tracks you need for your CD as temporary files and leave the permanent ones at 128-192 kbps on your hard drive. Burn your CD with the higher quality files, then throw away the temporary files when you’re done.
Before you do, just rename the original tracks to other (but similar) names to avoid confusion when preparing your future CD’s playlist. If you don’t know how to import, refer to last week’s column about importing tracks.
Now, let’s set those encoding settings. Pull down the Edit menu and select Preferences. Once there, click on Importing, and a pull down the second popup menu to choose Custom. You will get that window. Adjust the settings to the same as in the screen shot below.
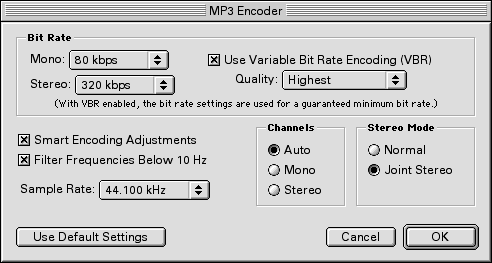
The difference between these settings and normal settings is easy to explain. The Bit Rate influences the quality of an MP3 file. Because you are turning on the Variable Bit Rate (VBR) encoding and setting it to Highest quality, you are taking the sound output to another level. Setting the Stereo setting to 320 kbps adds even more quality to your file. Also, make sure to set the Sample Rate to 44.100 KHz. This will ensure that you get top quality recordings on your custom compact discs. You want your music to sound as good as the original CD, right?
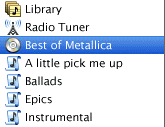
![]() Create a playlist, using the button we learned to use last week (left) or selecting New Playlist in the File menu. Name it. When importing one or a couple of songs from the original CD, all you need to do is uncheck all the songs’ check boxes, except the ones for the songs you wish to import. Click on Import. Do it for all the songs you need from your different discs.
Create a playlist, using the button we learned to use last week (left) or selecting New Playlist in the File menu. Name it. When importing one or a couple of songs from the original CD, all you need to do is uncheck all the songs’ check boxes, except the ones for the songs you wish to import. Click on Import. Do it for all the songs you need from your different discs.

As I’m a huge fan of Metallica’s old (1980s) albums; I like to listen to them often. If I go on the road or somewhere with my Discman, I don’t feel like carrying five CDs just to listen to my favorite tracks. I like listening to whole albums, but the best of a band can be just fine when I’m not home. So I’ll create a “Best of Metallica” disc.
I imported my songs in temporary “super high quality” files (remember, 320 kbps, 44.100 KHz, and Variable Bit Rate encoding) and organized them into a playlist. I dragged and dropped them around to make sure to give them the order I want. When you do that, make sure to select which tracks are good openers and stuff.
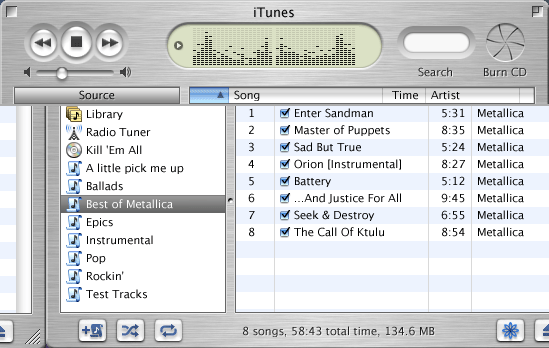
Quit all applications. It makes things go faster and eliminates the risk of iTunes being bothered, which would result in loss of quality or sound glitches. Insert a blank CD-R disc in your recorder. Click on Burn CD (see the button in the screen shot above). iTunes will look for your CD recorder and do its preliminary work. When ready, you will get what’s in the screen shot below.

Click on Burn CD a second time, and iTunes will get going.

Burn, baby, burn!
iTunes and your disc recorder will enter a preparing phase, preparing all your tracks for the burning process. After that, it will actually burn them to the disc. The time needed for this depends on the number of MP3 files you are burning, their size, and your recorder’s speed. Make sure that iTunes is the only active application to keep things going fast.

A few more seconds and it will be over.
 Once this is finished, take the disc out of the recorder and insert it in your normal CD-ROM or DVD-ROM drive. Name the disk and the tracks so that every time that you stick the new disc in your Mac’s drive, iTunes will remember the album and track names.
After burning my Best of Metallica disc, I listened to it and found it just great. It sounded as good as the original tracks on the albums. The audio was crisp, clear, and no annoying noises got in my way. This is exactly what you should be after.
A Word About Disc Quality
When you head to a store to get recordable compact discs, be careful about what you buy. Most CD-Recordable media is a bunch of baloney. Here are a few tips:
- No spindles: The freaky El Cheapo spindle packages hold nothing but bad surprises. They will work for a while, but those were manufactured with quantity in mind, not quality. Don’t even trust brand names that offer this.
- No 80 minutes: As great as it is, compact disc technology has its limits, and one of them is 74 minutes of music. You can’t stretch it without sacrificing quality, durability, and usability.
- No ReWritables: Discs that allow you to write more than once – CD-RW – are good for one thing: temporary burns. If you wish to burn computer data to transfer to another computer, that’s great. CD-RW is not for audio or critical backups. Moreover, it is less resistant to heat.
- Marker: To write the name of the CD on the media itself, get a waterproof permanent marker with a fine point. I personally use Staedtler markers, and they’ve been doing great so far. Remember not to write on the side where the recorder wrote the data!
What brands should you use? Look for Sony or Maxell. Those are the only brands I trust. Depending on which variety you buy, the price can be around US$1-2 per CD.
All of this sounds restrictive, but the quality of your audio, from the encoding settings to the quality of the media you use, depends on everything I told you about. If you want good burns that last for a while with great sound, encode quality files and burn them on quality media. It’s worth the extra touch.
Happy burning!
Keywords: #itunes #itunes1 #classicmacos #burningcds
Short link: http://goo.gl/wHM6yN
