
Nothing is more annoying that a cluttered desktop. It is nice to create aliases to your favorite applications and files, but it is not very nice to have them all over your desktop. Just like for a real desk, a cluttered computer desktop can be less functional and can distract you from your work.
- Description: Setting up a one-stop launcher
Difficulty level: Easy
System version: Mac OS 8.1 to 9.2 for popup windows
Required: Organizational skills
The solution? Regroup everything in one location. There are various ways to do this, and I will recommend two of them.
Apple Menu, System 7.5 to 9.2
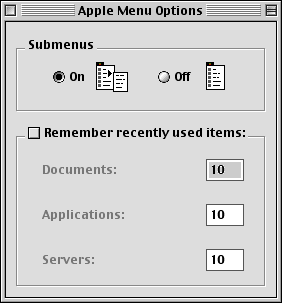
The Apple menu is part of the Mac OS. It is entirely free, and, if you know how to use it, it can be a very good launcher. Before you start, make sure to set the Apple menu’s options to allow submenus in folders. Go to the Apple menu, scroll down to Control Panels, and select Apple Menu Options. Once there, turn submenus on. If they are already active, leave them on and close the control panel.
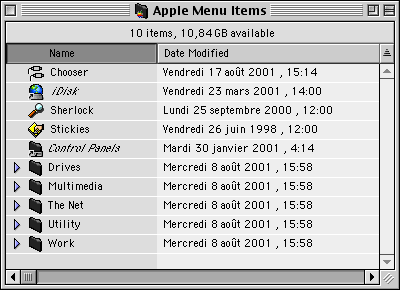
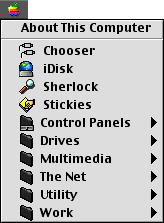
Whatever shows up in the folder shows up in the menu as well.
As you can see in the above comparison of my Apple Menu Items folder and the Apple menu itself, what I placed in my folder is exactly what shows up in the Apple menu. Whatever I put in the folder will be available in the menu. Everything that I select from there will be opened in the same fashion as if I double-clicked an icon.
- Tip: If some software installer dumps an alias in your Apple menu, go to the Apple Menu folder and remove the unwanted alias. This will clean up your Apple menu and make sure that no programmer decides how you customize it.
The smartest way to build a launcher is to have a hierarchy and place aliases into folders with logical and helpful names. For example, you should create a folder called Internet for your Internet-related applications, such as your browser, email client, instant messenger, etc. Use the same principle for everything. Put work files in a Work Files folder, multimedia software in a Multimedia folder, and so on.
In your Apple Menu Items folder, create all the folders you need, regrouping them in the way I explained above. You can definitely use my setup as a good way to sort your very own aliases. To start filling up the folders, find the files and applications that you wish to make available from your Apple menu. For each application or file, click on it and hold the mouse button down. Then press the Command and Option keys at the same time, and drag the icon to the folder where you want the alias to be. Release the mouse button, and then release the keys you were pressing. When you do this, you create an alias to the file or application that you wish to launch from the Apple menu. Do this for all your files, applications, and folders that you will use as submenus to launch stuff.
Doing this creates a great (and free!) launcher that unclutters your desktop. You can add and remove aliases at will.
Publisher’s note: There’s another option that works with System 7.1 (and perhaps 7.0, but I can’t test it). MenuChoice is a shareware hierarchical menu control panel that has many advantages over Apple Menu Options, and it’s faster.
Popup Windows, Mac OS 8.1 to 9.2
The Apple menu’s best use can be to launch applications. It is sometimes better to have files in folders that are easily available instead of including them in a launcher. How do you make a folder easily available without adding yet another icon to your desktop? Use popup windows.
Create a folder and place it wherever you want on your hard disk. Put all the files you want – again, you can regroup them by themes such as QuickTime movies, Word files, etc. – and leave the window open in the Finder. Press the Control key, hold it down, and click in an empty area in the middle of the window. In the contextual menu, go to View and select as Popup Window. After that, the open window will stick to the bottom of your screen, and it will have a tab on top of it. Click on the tab to minimize the window to its tab. Click on the tab again for the window’s content to show up.
![]()
You can also create a popup window by taking an open window and dragging it to the bottom of the screen until you see the shape of a tab. When you do, release the mouse button and you will have a small tab available. This is much nicer, since you can select the window’s location instead of watching the Mac OS putting it in the lower-left part of your screen.
You can make any folder a popup window, and you can create lots of popup windows. Put anything you want in them, whether it is a bunch of movie files or a bunch of folders that regroup crucial files. You can drag the windows around and resize them if you use the resize buttons carefully. When they are set up, you do whatever you want with them. It’s your Mac, right?
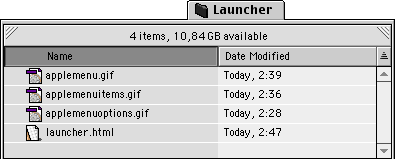
- Tip: Nothing is better than a popup window to make a folder easily available for a limited period of time. Sometimes I write a document that requires images and other files to be available for insertion or consultation. I put them all in a folder and make the window a popup window. Whenever I need to use one of the files, I open the popup window and access the files. When I am finished, I close the window for good. This prevents the window from covering a part of my screen and keeps it available.
In conclusion, these two methods – the Apple menu and popup windows – should allow you to launch anything you want from specific locations on your Mac. This way you can keep everything available, be productive, and keep your desktop squeaky clean.
The Apple menu and popup windows are some of the simplest features to use and render great services for free. They ship with every Mac; put them to good use!
Keywords: #applemenu #applemenuoptions #menuchoice #hierarchicalmenu #launcher #popupwindows
Short link: http://goo.gl/yUujfA
